![]()
Converting
MIDI to Audio for CD Burning |
||
Using
Cakewalk Software |
||
|
|
||
Background While a clarinet or guitar player will interpret a written music score and produce the sound required, it is a synthesizer or drum machine that is needed to interpret and play MIDI information. Fortunately for us, a complete set of these instructions can be captured and stored by a computer, and several types of music software (such as Home Studio or PrintMusic) can be used to edit, alter and play them back using the PC sound card, an external synthesiser or a software synthesiser. If the information is sent to several different MIDI devices, an entire electronic orchestra can be at the musician's disposal. MIDI does not actually transmit sound electronically; you couldn't connect a MIDI cable to a loudspeaker and expect to hear anything (you'd probably damage both your speakers and your ears if you tried!). MIDI information could be described as being like a piece of sheet music. Although the sheet music contains all the information needed for an instrumentalist to make music, it can't actually make any musical sounds itself. If you held the sheet music near a tape recorder and pressed record, nothing would happen. In the same way, when you try to export MIDI information to CD, all that happens is that the computer tries to export a series of silent MIDI instructions and no sound appears on your CD. If you want to record sheet music, you have to record someone actually playing that music; i.e. you record the sounds, not the written notes. In the same way, if you want to export MIDI information, you have to turn that MIDI information into audio information (actual sounds), which can then be recorded onto a CD just like you would record a flautist playing Mozart from the sheet music. If you don't do this then although you can hear your computer seemingly playing the MIDI information, what is actually being exported to burn onto the CD is silent computer instructions. In order to create an audio CD from any MIDI information, the MIDI must first be changed into a standard PC audio file (usually a file with a .WAV extension) - to do this using Cakewalk Home Studio 2002 (also applies for SONAR & Music Creator) choose the appropriate option from the list below and then follow the step-by-step instructions. |
||
|
|
||
|
||
Step-by-Step Instructions |
||
| Step
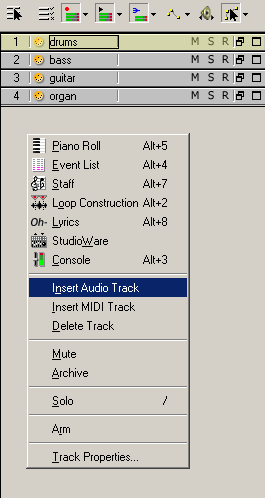
1 In Cakewalk Home Studio, open the file containing the MIDI information that you want to burn to CD. Create an audio track by right-clicking on the track pane and selecting 'Insert Audio Track' from the menu. |
||
 |
||
| Step
2 In the track pane, expand the audio track (using the 'Restore Strip Size' button - the two small squares). Right click on the 'Fx' field and from the drop down menus select 'DX Instruments' and then 'VSC DXi'. (This name may vary slightly depending on the version of Cakewalk you are using, e.g. it could be 'Virtual Sound Canvas', or 'EDIROL VSC'). If this is the first time you've opened the 'VSC' a 'Read Me' file will be displayed. Close this and you will now be able to see the 'VSC' control window. |
||
 |
||
| Step
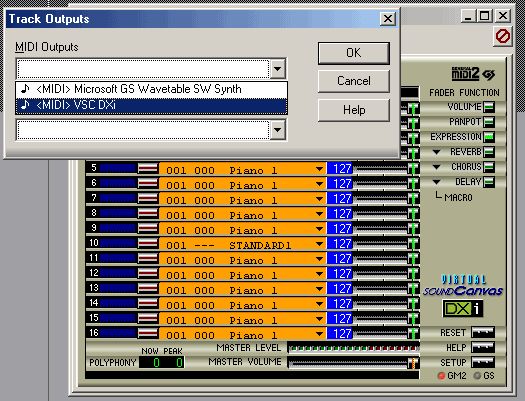
3 In the track pane, double click the number 1 on the first track to highlight all the tracks. From the menu bar at the top of the screen select 'Track', then 'Property' and 'Outputs'. This will open the 'Track Outputs' dialogue box. From the 'MIDI Outputs' drop-down menu, select 'VSC DXi' (or 'Virtual Sound Canvas', 'EDIROL VSC' etc.). Then click 'OK'. |
||
 |
||
| Step
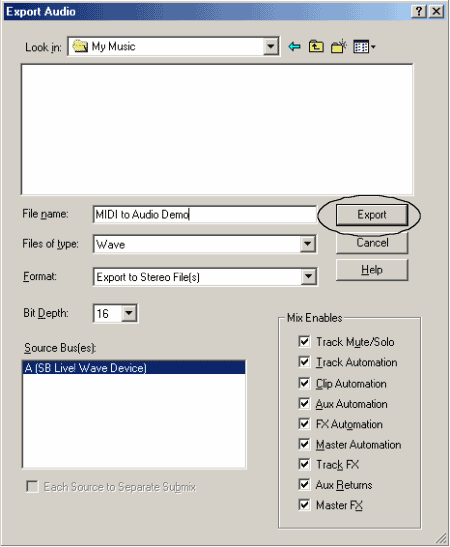
4 Listen to your file to make sure everything sounds as you want it (press the space bar to start and stop playback). Ensure all the tracks are still highlighted, then from the menu bar at the top of the screen, select 'File' and 'Export Audio'. In the new dialogue box give your music a file name and choose a location to save it to (e.g. 'My Music') then click on 'Export'. Your file has been saved as a .wav file ready for burning to CD using the appropriate software, e.g. Pyro. |
||
 |
||
|
||
|
||
| Step
1 Open the file containing the MIDI information that you want to burn to CD. Create an audio track by right-clicking on the track pane and selecting 'Insert Audio Track' from the menu. |
||
|
||
| Step
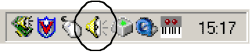
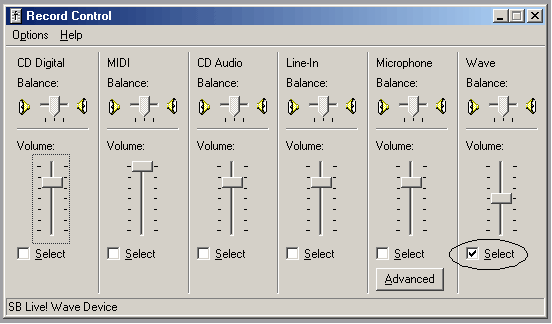
2 Open the 'Play Control' dialogue box by double clicking on the Speaker Icon at the bottom right hand side of your Windows screen. (If the Speaker Icon is not there, click the Windows 'Start' button, then select 'Programs', 'Accessories', 'Entertainment', 'Volume Control'). |
||
 |
||
| Step
3 In the 'Play Control' dialogue box, select 'Options', then 'Properties'. This will open the 'Properties' dialogue box. Ensure that 'Recording' is checked under 'Adjust volume for'. From the list under 'Show the following volume controls' select the option that will allow you to record the sound that comes out of your speakers. (In this case the option is 'Wave', but it may also be called 'Stereo Out', 'Stereo Mix', 'What U Hear' or something else depending on your soundcard - you may need to try several options if you are unsure). Click 'OK'. |
||
 |
||
| Step
4 The 'Record Control' dialogue box will open automatically. Under 'Wave' (or 'Stereo Out','Stereo Mix', 'What U Hear' etc.) ensure that 'Select' is checked. Close the dialogue box. |
||
 |
||
| Step
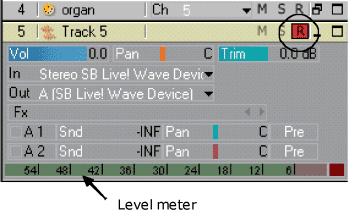
5 In the track pane in Cakewalk Home Studio, expand the audio track (using the 'Restore Strip Size' button - the two small squares) so that the level meter is visible, and click on the 'arm to record' button (R). Press play and check the level on the level meter. If the level is too high or too low, it can be adjusted in Windows 'Volume Control' dialogue box (see step 2). When you are happy with the levels, click the record button (first ensuring that the cursor is at the point from which you want to record) and record the full length of the track. Your MIDI information will now appear as a newly recorded audio clip in the clips pane. |
||
 |
||
| Step
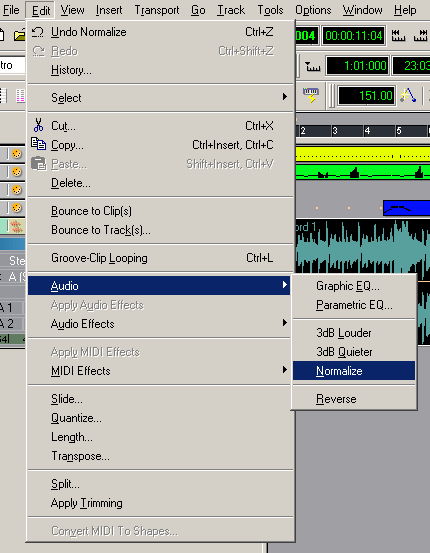
6 Click on the new audio clip to highlight it. From the menu bar at the top of the screen, select 'Edit', 'Audio' and 'Normalise'. This will boost the volume of the new audio track to a level appropriate for recording to CD, without danger of distortion. |
||
 |
||
| Step
7 From the menu bar at the top of the screen, select 'File', then 'Export Audio'. In the new dialogue box give your music a file name and choose a location to save it to (e.g. 'My Music') then click on 'Export'. Your file has been saved as a .wav file ready for burning to CD using the appropriate software, e.g. Pyro. |
||
|
||
|
||
|
||
| Step
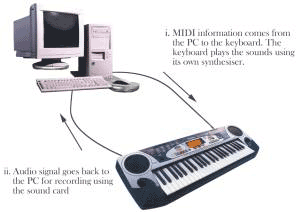
1 Connect the audio 'Line Out' (not MIDI) on the instrument to the audio 'Line In' on the sound card. |
||
 |
||
| Step
2 In Cakewalk Home Studio, open the file containing the MIDI information that you want to burn to CD. Create an audio track by right-clicking on the track pane and selecting 'Insert Audio Track' from the menu. |
||
|
||
| Step
3 Open the 'Play Control' dialogue box by double clicking on the Speaker Icon at the bottom right hand side of your Windows screen. (If the Speaker Icon is not there, click the Windows 'Start' button, then select 'Programs', 'Accessories', 'Entertainment', 'Volume Control'). |
||
|
||
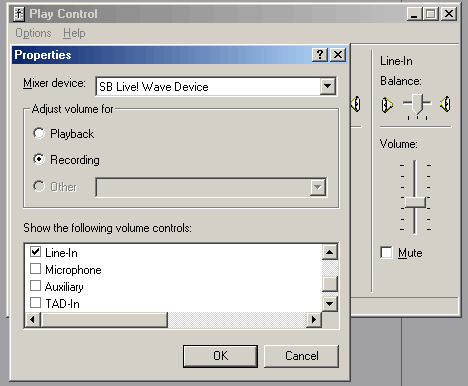
| Step
4 In the 'Play Control' dialogue box, select 'Options', then 'Properties'. This will open the 'Properties' dialogue box. Ensure that 'Recording' is checked under 'Adjust volume for'. From the list under 'Show the following volume controls' select 'Line In'. |
||
 |
||
| Step
5 The 'Record Control' dialogue box will open automatically. Under 'Line In' ensure that 'Select' is checked. Close the dialogue box. |
||
 |
||
| Step
6 In the track pane in Cakewalk Home Studio, expand the audio track (using the 'Restore Strip Size' button - the two small squares) so that the level meter is visible, and click on the 'arm to record' button (R). Press play and check the level on the level meter. If the level is too high or too low, it can be adjusted in Windows 'Volume Control' dialogue box (see step 3). When you are happy with the levels, click the record button (first ensuring that the cursor is at the point from which you want to record) and record your music. Your newly recorded music will now appear as a new audio clip in the clips pane. |
||
|
||
| Step
7 Click on the new audio clip to highlight it. From the menu bar at the top of the screen, select 'File', 'Audio' and 'Normalise'. This will boost the volume of the new audio track to a level appropriate for recording to CD, without danger of distortion. |
||
|
||
|
Step
8 From the menu bar at the top of the screen, select 'File', then 'Export Audio'. In the new dialogue box give your music a file name and choose a location to save it to (e.g. 'My Music') then click on 'Export'. Your file has been saved as a .wav file ready for burning to CD using the appropriate software, e.g. Pyro. |
||
|
||
|
BACK
|
||